Harnessing the Power of Butter
I seriously underestimated just how much the French love butter.
I made croissants last week, and they were amazing. I cannot count how many times I doubted what I was doing, panicking that I had messed up and the little rolls would turn out as rocks...but I was so happily surprised! It was only my second time cooking with yeast, and I feel a lot more confident with it now than I did when making baguettes.
The setup for this recipe was very simple. 500g flour, 60g sugar, 10g salt, and 10g dry yeast are mixed together before adding 200ml room temperature milk and two eggs. This mixture was very sticky, and it's okay to add a few splashes of milk as needed so it's easier to knead. I covered it with a towel and let it sit on the counter for an hour. It rises for another half hour after re-kneading; by this point, it had almost doubled in size! A warmer environment helps it rise, so I learned to keep it near the light under the wall cabinets. At this time, I took a stick of butter out of the fridge to let it soften, and I think it would help to do this earlier to aid the next step.
I rolled out the dough into something resembling a square, then cut the butter into small pieces to spread it onto the dough (without touching the edges!). The recipe's tip here was that the butter and dough should be of a similar consistency so that the butter is soft enough and the dough isn't too sticky. I had to move the dough to a marble board instead of my usual wooden cutting board because it wasn't big enough! As you can see, I also kept a lot of flour nearby to use when transporting the dough, because it kept it just dry enough to cleanly peel away from the marble.
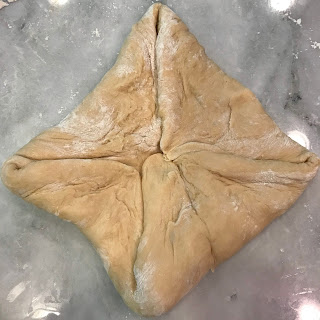
Here, the corners fold into the center, the dough is rolled out into a long rectangle, and then folded like a brochure. (Not pictured: second roll out and folded in half horizontally). This step was really difficult because the butter needs to stay inside as much as possible, and the dough and butter both soften as they sit. I had to find a balance between working quickly to move the dough while still rolling slowly enough to contain the butter filling. Again, I kept a lot of flour on hand to avoid too much stickiness.
The hardest part yet came when I needed to repeat the folding process. There was no way to avoid the butter spilling out, and it started getting slippery on the marble despite the dryly sticky dough. More flour. I started feeling pretty frustrated and I wasn't sure if this would actually affect the croissants when they baked. As it turns out, it didn't matter...but I learned my lesson and I'll be sure to watch videos of more complicated recipes from here on out!
After the second rolling and folding session, the lump is refrigerated for half an hour, mainly to help combat the melting butter. Yay! The rest of the recipe was back to my comfort level. I rolled the dough out to be roughly 40 by 50 centimeters (vertically), then made cuts as shown to be rolled into the beloved croissant shapes.
I learned later that the traditional way to cut the triangles is to first clean up the edges of the square so that they are all the same size, then reroll the excess dough and cut more triangles. I didn't mind having slightly different sizes as they still baked evenly, so I would still go right ahead with the cuts next time.
Look at how cute these are! I rolled them up starting with the wide end of the triangle and curled the edges in just a bit as I went. I placed eight each on two baking sheets coated in butter, then let them rise for another hour. The periodic rising was what took the most time...and the fact that I was extremely nervous in the folding steps...so by the time I took the croissants out of the oven, six hours had passed. I think the estimated time on the recipe was four hours. Oops.
With about fifteen minutes left to rise, I prepared the egg wash: one egg yolk diluted with water. It didn't need as much water as I thought because it goes a long way, but it's to prevent sticky and/or crusty tops. I preheated the oven to 410 F (testing my conversions once again), and finally stuck my pans in for six minutes.
Halfway through! Since they bake for 10-15 minutes, I took them out after six to rotate and flip the pans. I've gotten used to working around an old oven, as I've mentioned in other posts. I would probably still do this with any oven, though, to ensure even baking.
Here they are! I thought at first that they were too dark, but the insides were still fluffy and soft. You can see that the bottoms got pretty dark because I overbuttered the pans, but they weren't burned!
The. Perfect. Roll. This was super exciting for me to see when I pulled one apart! They had a great balance of flaky and buttery, but still moist and fluffy. I'm looking forward to when I have more time to make these...which realistically won't be for another few months, but still. I'd call these a success and I definitely learned to be patient like a French baker :)


Comments
Post a Comment