Brioche de Boulanger
I'm not sure how November snuck up on us so quickly, but here we are. I'm finally catching up on recipe photos and posts now that I have a few seconds to breathe between school projects!
I really enjoyed making brioche a few weeks ago, and I'm hoping to try it again during Thanksgiving break. As is the trend with many of the French recipes I've made recently, it took longer than I expected it too, so I've been waiting on baking for awhile. And I miss it! So instead, the next best thing is editing my photos of beautiful, fluffy bread.
Brioche is a very popular breakfast item in France, and its sweet taste and cake-like texture makes it all too easy to snack on. It's another instance of very basic ingredients coming together into something that feels decadent but is actually super simple!
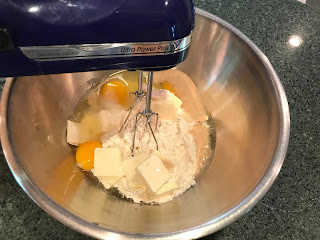
When I made brioche, I read ahead in the recipe and confused myself, adding the butter too early. It made no difference (as far as I know), but I would have had an easier time mixing if I had first combined the other ingredients independently. Now is the time to add 125 grams cold unsalted butter, cut into small pieces.
If you're as impatient as I am, you won't want to mix for another 20 minutes, but you really do need to. The dough will begin to pull away from the bowl as you go, which is a good thing! Even still, continue mixing for the full 20 minutes to let the yeast get to work.
By this point, the dough is ready to start rising! Cover with a sheet of plastic wrap and let it sit for 2 hours. You can also cover the dough with a towel, but make sure it's warm and just slightly damp; plastic wrap is the best option because it will prevent the dough from forming a crust. That's ideal for baguettes, but not for brioche!
At the 2 hour mark, wrap the dough in the plastic and place in the fridge for at least an hour, or in the freezer for 10 minutes. This will stop the yeast from continuing to grow, and it will make the dough slightly denser so that it's easier to work with. Next, flour a cutting board and divide the dough into 8 equal pieces with a knife:
Butter a bread pan and place each ball inside in two rows, as shown below. I twisted each ball slightly to give a swirled texture to the sides, but as the brioche bakes it doesn't really affect it. Next time I'll place the smooth side face up to avoid small indentations after baking.
Into the oven! Bake for 25 minutes and keep a close eye on the color. If it browns too quickly, you can cover the top of the pan lightly with aluminum foil. Luckily, I was able to avoid this, but my bread did stick to the sides of the pan. Don't worry if this happens! All you need to do is gently slide a thin spatula or knife along the sides to help release the bread. Make sure it's completely cooled before trying to unmould.
The egg wash turned out so nicely! The shiny top wasn't too greasy and the bread was perfectly soft all the way through. Thin slices are harder to cut, so I would advise 1/2 - 3/4 inch slices to avoid crumbling. It also makes for great toast :) This will definitely be a go-to in the winter when I'm looking for a low-maintenance recipe that makes my kitchen smell like a bakery.


Comments
Post a Comment